

Most Singapore homeowners feel lost when they start planning a home renovation. The process feels big, confusing, and expensive all at once. You are not sure where to begin, who to trust, or how much to set aside. That uncertainty causes costly mistakes before a single wall gets touched.
With 10 years of renovation experience across HDB flats and condos in Singapore, we have seen the same problems repeat. Homeowners jump into decisions too fast. They pick a contractor before setting a budget. They skip permits. They regret material choices that looked great in a showroom but failed in real use. These mistakes add weeks and thousands of dollars to a project.
This guide walks you through every stage of a home renovation in Singapore. You will learn how to budget correctly, hire the right people, get permits, manage the work sequence, and avoid the most common and costly mistakes.
Renovation Fundamentals for Singapore Homes
Planning a home renovation in Singapore takes about 3 to 6 months from start to finish. The actual on-site work runs 8 to 12 weeks. The rest involves decisions, permits, sourcing, and coordination. Getting the fundamentals right at the start saves time and money later.
Singapore homes come with specific rules, building types, and approval processes. What works in a landed house does not always apply to an HDB flat. Your property type shapes every decision you make, from what you can tear down to who you need to notify.
Start by understanding what kind of renovation your home needs. Not every project requires a full overhaul. Some homes just need fresh surfaces and better lighting. Knowing this early prevents overspending on work your home does not actually need.
Types of Renovation Projects
Renovation projects in Singapore fall into two broad groups: cosmetic improvements and structural changes. Cosmetic work covers painting, flooring, lighting, and fixture replacement. Structural work involves hacking walls, changing layouts, and replacing plumbing or electrical systems.
Cosmetic projects cost less and finish faster. They usually need fewer approvals. Structural projects take longer, cost more, and require proper permits before any work begins.
Knowing which type your home needs shapes your budget, timeline, and hiring decisions.
Renovation vs Remodeling Distinctions
Renovation means restoring or improving what already exists. You update the look, fix worn areas, and improve function without changing the basic structure. Remodeling means changing the layout or structure itself, like combining two rooms or relocating a kitchen.
In Singapore, remodeling triggers additional approval requirements, especially for HDB flats. This distinction matters because it affects both your cost and the permits you need.
Many homeowners start with renovation goals but end up remodeling once they see the space. Decide this early so your contractor quotes accurately from the beginning.
HDB vs Condo Renovation Considerations
HDB and condo renovations follow different rules. HDB flats fall under the Housing and Development Board guidelines. Condominiums are governed by the building’s Management Corporation Strata Title, also called the MCST.
HDB flats have stricter rules around hacking, structural changes, and approved materials for certain elements. Condos have their own by-laws that may restrict working hours, debris disposal, and the type of work allowed without management approval.
Always check the specific rules for your property type before planning anything. Assumptions lead to rejected permit applications and costly rework.
Preparation and Budgeting (6 to 9 Months Out)
Start planning your renovation 6 to 9 months before you want work to begin. This timeline gives you space to research properly, set a solid budget, compare contractors, secure permits, and make decisions without pressure. Rushing this phase is one of the most common and expensive mistakes homeowners make.
Customers struggle with renovation costs because they start shopping before they know what they can actually spend. This leads to poor comparisons and contractor quotes that do not reflect the real scope of work. Setting your budget first changes everything.
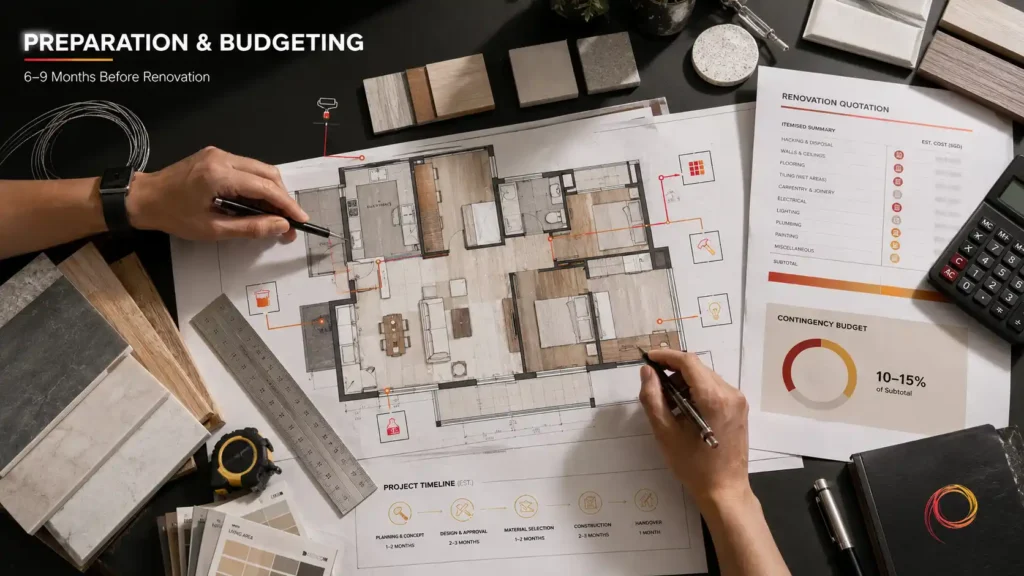
Define Scope and Needs
Define your household’s real needs before you think about design. Consider how you use each room, how much storage you need, and whether your current layout actually works for your family.
Decide whether you need major layout changes or mainly cosmetic updates. A clear scope stops the project from expanding mid-way, which is where most budget overruns begin.
Get the official floor plan from your building management or HDB. Use it to review the existing layout before approaching any professional. This one step saves hours of confusion during consultations.
Set Your Financial Baseline
Set your maximum renovation budget before meeting any contractor or interior designer. Base this on your property type, flat size, age of the unit, and how much structural work you expect.
An older resale HDB flat usually needs more work than a new BTO unit. A condo with original fittings from 15 years ago will cost more to restore than a newer unit. Factor these realities into your number before anyone quotes you.
Do not let design excitement push you past what you can comfortably spend. Set the number first. Hold to it.
Add a Contingency Buffer
Keep 10% to 15% of your total budget aside as a contingency. Unexpected site conditions appear in almost every renovation. Old plumbing hidden behind walls. Uneven subfloors. Water damage from previous leaks. These issues cost money to fix and were not in your original quote.
This buffer is not extra spending money. It is insurance for the unexpected. Homeowners who skip it end up borrowing mid-project or cutting corners on finishing work.
If the buffer goes unused, you can redirect it toward furniture or appliances after handover.
Explore Financing
Explore renovation financing options early if your savings fall short. Banks in Singapore offer renovation loans specifically for home improvement projects. Interest rates and loan limits vary, so compare options before committing.
Do not plan your renovation around a loan you have not confirmed yet. Get pre-approval or a firm indication before locking in a scope with your contractor.
Financing should support your plan, not define it.
Professional Selection and Design (4 to 6 Months Out)
Start comparing interior designers and contractors 4 to 6 months before renovation begins. This window gives you time to shortlist, compare quotes, review portfolios, and finalize contracts without rushing. Choosing the wrong professional at this stage causes problems that are very hard to undo.
Do not rely on a single quote. Get at least three detailed, itemised quotations. Compare them line by line, not just by total price. Differences in unit rates, material quality, and included work explain why quotes vary widely.
Check each company’s registration, accreditation, and relevant credentials. Review past projects that match your property type. A firm that handles condos well may not have strong HDB experience, and vice versa.
Refine Layout and Quotes
Finalise your layout before carpentry and custom work enters production. Use the official floor plan to confirm room dimensions and electrical requirements. Consider the unit’s natural light, ventilation, and orientation when positioning rooms and fixtures.
Once carpentry enters production, changing your mind gets expensive. Finalise the layout, confirm it fits the floor plan, and then sign off. Ask your contractor or designer to flag any technical issues with your proposed layout before work begins.
Agree on a milestone-based payment schedule. Tie each payment to a clearly completed and visible stage of work. Never pay the full amount upfront.
Sourcing and Hiring (3 to 4 Months Before)
Confirm your contractor or interior designer 3 to 4 months before renovation starts. This gives enough lead time for permit applications, material ordering, and production of custom carpentry.
ID vs. Contractor
An interior designer handles design, coordination, and project management. A main contractor handles construction directly without the design layer. Both paths have real trade-offs.
An interior designer suits homeowners who want a single point of contact and a fully designed outcome. A contractor suits homeowners who already know what they want and prefer direct control. Choose based on your involvement level and confidence in making design decisions.
Verify Credentials
Check that your contractor or interior designer holds the relevant registrations. In Singapore, look for membership in the Renovation and Decoration Advisory Centre, commonly known as RADAC, or registration under the Housing and Development Board for HDB renovation works.
Ask directly. A legitimate professional will show credentials without hesitation. If they deflect, take that seriously.
Finalize Quotes
Compare quotes based on exact scope, quantities, material specs, and exclusions, not just the bottom line. A low total price often hides excluded items that become variation orders later. These additions can cost more than the original savings.
Ask each contractor to explain what is and is not included. Understand what triggers an extra charge. Get this in writing before signing anything.
Staged Payment Schedule
Use a milestone-based payment schedule to protect yourself throughout the project. Typical renovation contracts in Singapore split payments across stages like contract signing, hacking completion, carpentry delivery, and final handover.
Never pay more than what the completed work is worth at each stage. This keeps the contractor motivated and gives you leverage if issues arise. Avoid any contractor who demands full payment or a very large deposit upfront.
Choosing Renovation Materials and Finishes
Choosing the right materials affects how your home looks, feels, and holds up over time. Poor material choices create maintenance problems that follow you for years. Picking the right finishes for each area of your home is one of the most important decisions in the entire renovation.
Many homeowners choose materials based on appearance alone. This leads to regret. A beautiful tile that chips easily in a high-traffic area is a bad choice, no matter how much you love the look.
Selecting Materials by Durability and Maintenance
Choose materials based on how each space is actually used. Kitchen floors need to handle grease, heat, and heavy foot traffic. Bathroom surfaces must resist moisture and mold. Living areas need durability without sacrificing appearance.
Porcelain and homogeneous tiles are popular in Singapore homes because they are durable, easy to clean, and moisture-resistant. Engineered timber and vinyl planks work well for bedrooms and living rooms where comfort and aesthetics matter more.
Ask your contractor about long-term maintenance requirements for each material before you commit.
Comparing Material Quality and Specifications
Not all materials of the same type perform equally. Tile thickness, hardness ratings, and slip resistance vary significantly between products at similar price points.
Ask your contractor for the technical specifications of recommended materials. Compare these across options before deciding. A slightly higher upfront cost for better-quality material often saves money on repairs and replacements over the long term.
Matching Finishes to Your Renovation Priorities
Match your finish choices to what matters most in your home. If low maintenance is your priority, avoid materials that require regular sealing, polishing, or special cleaning products. If aesthetics come first, be prepared to invest more time in upkeep.
Surfaces like marble look stunning but require care. Laminates and engineered stones offer a similar visual result with far less maintenance. Discuss this trade-off openly with your contractor or designer before finalising selections.
Assess Lighting and Electrical Requirements
Plan your lighting and electrical layout before walls and ceilings are closed up. Once concealed wiring is complete and surfaces are finished, making changes becomes expensive and disruptive.
Think about how you use each room throughout the day. Kitchens need bright task lighting. Bedrooms benefit from warm, layered light. Living areas often work best with a mix of ambient and accent lighting. Plan each zone separately.
Identify where you need additional power points now. Consider where you will place televisions, appliances, and charging stations. Adding electrical outlets after renovation is far more costly than planning them correctly at the start.
Work with your contractor to confirm that the existing electrical load can support your planned additions. In older HDB flats, the existing wiring may need upgrading to safely handle modern appliances and lighting loads.
Approvals and Permits (1 to 2 Months Out)
Secure all required permits and approvals before any physical work begins. Starting work without the correct approvals risks enforcement action, fines, and costly removal of completed work. This is not a step to skip or delay.
Clear Regulatory Bodies
Identify which authorities govern your renovation based on your property type. For HDB flats, the Housing and Development Board sets the rules. For private condominiums and apartments, the MCST controls what work is allowed and when. Some structural work may also require clearance from the Building and Construction Authority.
HDB/BCA and MCST
HDB approval covers hacking, wet works, structural changes, and certain fitting installations. For condominiums, MCST approval is typically required for any work that affects common areas, structural elements, or shared systems like plumbing stacks.
Both sets of rules define working hours, noise restrictions, and neighbour notification requirements. Know these rules before your contractor begins. Violating them can halt your project entirely.
Defects Inspection
Inspect for existing defects in your home before renovation starts. Document water damage, cracks, uneven surfaces, and pre-existing issues with photos and written notes. This protects you from disputes later about whether damage was caused during renovation.
Secure Permits
Do not allow hacking or structural alterations to begin before receiving written approval. Submit permit applications early because processing takes time. Build the permit timeline into your project schedule so that approval arrives before your contractor is ready to begin.
Execution and Work Sequence (8 to 12 Weeks)
On-site renovation work follows a set sequence to avoid costly rework. Each trade depends on the one before it. Starting in the wrong order causes delays, damage, and additional costs. Understanding the sequence helps you track progress and spot problems early.
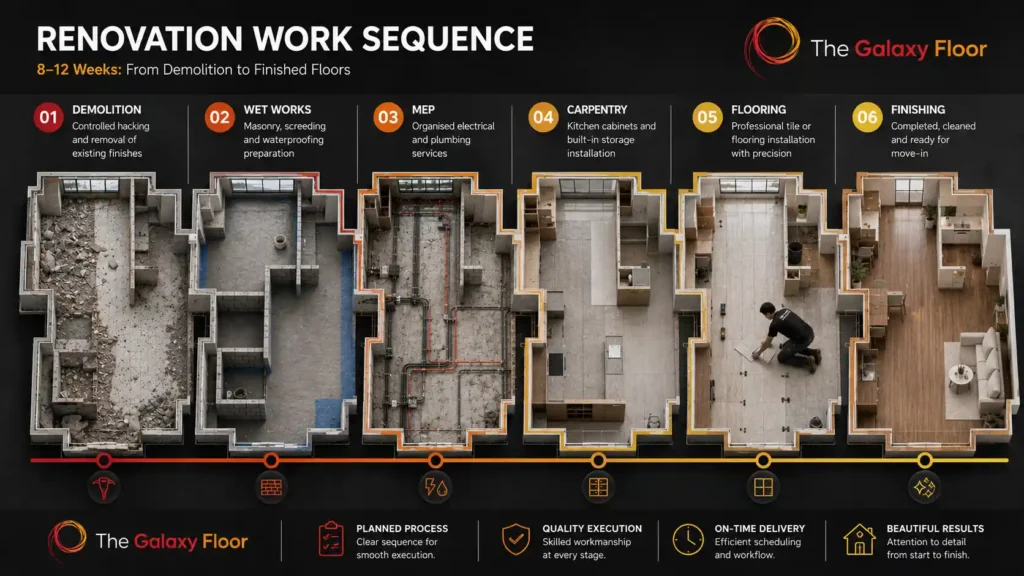
Demolition and Hacking
Demolition and hacking happen first, usually in the first week. Approved walls, flooring, fixtures, and built-ins are removed. Debris is cleared from the site. This stage typically takes 3 to 7 days depending on the scope.
Only approved areas should be hacked. Any hacking beyond the approved scope can trigger enforcement issues and must be rectified at the homeowner’s expense.
Masonry and Wet Works
Masonry and wet works follow demolition, running roughly from weeks 2 to 4. This includes building approved partition walls, completing bathroom and kitchen wet works, applying waterproofing, screeding floors, and laying wall and floor tiles.
Allow each stage of wet works to cure properly before the next stage begins. Rushing waterproofing and screed causes long-term failures that are very expensive to fix after everything is tiled over.
MEP (Electrical and Plumbing)
Mechanical, electrical, and plumbing first-fix work runs alongside and after wet works, typically weeks 4 to 5. This covers concealed wiring, electrical points, plumbing lines, drainage connections, and air-conditioning piping.
All concealed work must be completed before walls, ceilings, and carpentry cover the access areas. Changes after this stage are expensive and disruptive.
Carpentry and Installation
Carpentry and ceiling works run from roughly weeks 6 to 9. False ceilings, kitchen cabinets, built-in wardrobes, feature walls, and storage systems are installed during this phase.
Coordinate carpentry carefully with your electrical and lighting plan. Misaligned lighting inside carpentry features is a common and avoidable mistake. Confirm all positions before installation proceeds.
Waterproofing
Waterproofing is applied in wet areas before tiling begins. Bathrooms, kitchen wet zones, and balconies all require proper waterproofing membrane application. This step is not visible in the finished home but is critical for preventing water leaks to the units below.
Poor waterproofing is one of the most common causes of post-renovation disputes in Singapore condominiums. Confirm that waterproofing is tested before tiling covers it.
Tiling and Flooring
Tiling and flooring work follows waterproofing and screeding. Wall tiles go up before floor tiles in wet areas. Flooring in dry areas like living rooms and bedrooms is typically installed in the later stages to avoid damage from ongoing works.
Inspect tile work closely as it progresses. Hollow tiles, uneven joints, and poor lippage are much easier to fix during installation than after grouting is complete.
Finishing and Deep Cleaning
Painting, second-fix electrical, plumbing fixtures, and finishing details complete the renovation. This phase covers walls and ceiling painting, light fixture installation, switches, sockets, taps, and sanitary fittings.
After all finishing work is done, arrange a professional post-renovation deep clean. Construction dust settles everywhere and must be fully removed before you move in.
Managing Renovation Changes and Additional Costs
Changes during renovation cost more than decisions made before work begins. Every change mid-project generates variation orders. These add cost and delay. Manage this risk by making as many decisions as possible before the contractor starts.
Adding Electrical Outlets
Adding electrical outlets after first-fix wiring is complete requires opening finished surfaces. This means hacking tiled walls or ceilings, running new cable, and making good the surface again. What costs a small amount before concealment can multiply significantly afterward.
Finalise your electrical layout completely before your contractor begins wiring work.
Upgrading Fixtures
Upgrading fixtures mid-project is common but adds to the final bill. Many homeowners change their minds on tap fittings, light fixtures, or sanitary ware after seeing the space take shape. Some upgrades are minor. Others require replumbing or rewiring.
Discuss the cost implication of any upgrade before agreeing to it. Ask for a written variation order showing the exact additional cost.
Modifying Built-In Cabinets
Changing built-in cabinet designs after production has started incurs waste and rework costs. Custom carpentry is produced off-site based on your confirmed design. Changing dimensions, configurations, or finishes after production begins means scrapping completed work.
Confirm your carpentry design fully before the contractor places the production order.
Handover and Defect Inspection
Conduct a thorough joint inspection before making your final payment. Walk through every room with your contractor or interior designer. Check every surface, fitting, and function. Do not rush this inspection. It protects your rights and ensures the contractor addresses problems while they are still on-site.
Inspect Thoroughly
Check walls, floors, tiles, carpentry, doors, electrical points, plumbing, and fittings carefully. Look for scratches, chips, hollow tiles, uneven surfaces, misaligned doors, gaps in carpentry, unfinished edges, and damaged fixtures.
Create a formal defect list. Write down every issue you find. Photograph everything. Share this list with your contractor in writing.
Rectification Period
Give your contractor reasonable time to rectify all documented defects before releasing the final payment. Once the final payment is made, your leverage changes significantly. Use that leverage wisely.
After rectification, do a second walkthrough to confirm every item on the defect list has been addressed. Collect all warranties, appliance manuals, and relevant documents during handover.

Common Renovation Planning Mistakes to Avoid
The most costly renovation mistakes happen before any work begins. Skipping the planning phase, picking a contractor by price alone, and starting without a confirmed budget create problems that are very difficult to fix mid-project.
Do not approach multiple contractors without a defined scope. Vague briefs produce incomparable quotes. You end up comparing prices for very different scopes of work, which tells you nothing useful.
Do not finalise materials on-site during construction. Rushed choices under pressure lead to regret. Select all major materials before work begins. Confirm quantities with your contractor to avoid shortages.
Do not skip the defect inspection. Many homeowners feel awkward pointing out problems. Push past that. Defects left unfixed cost real money and create long-term frustration.
Do not ignore permit requirements. Unauthorised works must be removed at your cost. No contractor can protect you from enforcement if the work was done without approval.
Common Renovation Challenges and Solutions
Renovation challenges appear on almost every project. Knowing what to expect helps you handle problems without panic. Most issues have practical solutions when caught early.
Budget Overruns and Cost Control
Budget overruns happen when scope increases without cost tracking. This problem happens when homeowners add requests verbally without confirming the price impact in writing. Every addition should come with a written variation order before work proceeds.
Track your total spending against your budget throughout the project. Do not wait until handover to count the cost.
Timeline Delays and Schedule Management
Delays happen most often when wet works and carpentry are not properly sequenced. Material deliveries that arrive late, site access issues, and permit approvals that take longer than expected all push the timeline out.
Ask your contractor for a realistic schedule at the start. Build buffer time into your move-in date. Do not book movers based on the earliest possible completion date.
Quality Control and Workmanship Issues
Quality problems are easier to fix during the project than after it is complete. Visit the site regularly. Look at tiling, carpentry alignment, painting edges, and fitting installations as they progress.
If you see something that does not look right, raise it immediately. Do not wait for the final inspection to flag an issue that has been growing for three weeks.
A Final Word On Planning Your Home Renovation
A well-planned renovation creates a home that works for your family for years. Poor planning creates a stressful, costly experience that leaves you living with compromises. The difference between these two outcomes is almost always in the preparation, not the construction.
Give the planning phase the time it deserves. Set your budget before you talk to anyone. Understand your property’s rules before you decide what to change. Hire professionals whose track record matches what you need. Finalize every decision before work begins.
Your renovation is a significant investment of time, money, and energy. Protect it by making good decisions at every stage. Use this guide as your starting framework and get professional advice specific to your property and scope before you commit.
Frequently Asked Questions
How Early Should I Start Planning My Home Renovation in Singapore?
Start planning your home renovation 6 to 9 months before you want work to begin. This gives you time to define your scope, set a budget, research professionals, compare quotes, finalise design decisions, apply for permits, and source materials without rushing.
Homeowners who start too late end up making rushed decisions. Rushed decisions lead to wrong hires, poor material choices, and skipped permits. The planning window is not wasted time. It prevents expensive mistakes.
How Do I Plan a Home Renovation Step by Step?
Plan your renovation by following this sequence: define scope, set budget, hire professionals, finalise design, secure permits, begin construction, inspect, and complete handover. Each step builds on the one before it.
Start with what you need and what you can spend. Hire the right people. Lock in your design before carpentry and custom work begin. Get all approvals before any hacking starts. Follow the correct work sequence on-site. Inspect thoroughly before paying the final amount.
How Much Should I Budget for a Home Renovation in Singapore?
Your renovation budget depends on your property type, flat size, unit age, scope of work, and material choices. There is no single correct number that fits every home.
Base your budget on your specific requirements and property condition. Always keep a 10% to 15% contingency buffer on top of your quoted amount. This buffer covers unexpected site conditions, additional work, and material changes that appear during construction.
What Is the Recommended Sequence for Renovations in Singapore?
The recommended renovation sequence is demolition, masonry and wet works, concealed mechanical and electrical work, carpentry, painting, second-fix fittings, and post-renovation cleaning. Each stage must complete and cure before the next begins.
Following this sequence prevents rework. Doing tiling before waterproofing is tested, or painting before carpentry is done, creates damage and delays. The sequence exists for practical reasons, not arbitrary ones.
What Is the Correct Order to Renovate a House?
Start with demolition, then build new structures, then handle concealed services, then install carpentry, then paint, then install fixtures and fittings. Finishing and cleaning come last.
This order protects completed work from damage by later trades. Flooring goes in after dusty trades are done. Painting happens after wet works are fully cured. Fixtures go in after walls are finished. Follow the sequence and your renovation will run more smoothly.
What Should I Expect During the Renovation Process?
Expect noise, dust, multiple tradespeople on-site, and some deviation from the original schedule. Renovation is a live construction process. Conditions change. Materials arrive late. Site discoveries happen.
Stay in regular contact with your contractor. Visit the site regularly. Make decisions promptly when your contractor needs input. Delays often happen because the homeowner is unavailable to confirm a choice. Being responsive keeps your project moving.
Can I Start Renovation Before HDB Completion?
You cannot begin physical renovation works before your HDB flat is officially handed over to you. The unit must be in your legal possession before any renovation activity begins.
You can use the time before handover for planning, design, hiring, and permit preparation. Have everything ready so renovation can begin shortly after you receive the keys.
Are There Any Permits Required for HDB Renovations?
Yes, HDB renovations require permits for specific types of work. Hacking of walls, installation of grilles or gate frames, changes to the bathroom waterproofing area, and other structural or wet-area works require HDB approval before they begin.
Your contractor or interior designer should be familiar with HDB renovation requirements and guide you through the application process. Do not allow any work that requires approval to begin before the written permit is received.
Conclusion
Planning a home renovation in Singapore from start to finish requires the right sequence, clear decisions, and early preparation. Begin 6 to 9 months out. Set a firm budget with a 10% to 15% contingency. Hire the right professional after comparing at least three detailed quotes. Secure all HDB or MCST approvals before any work begins. Follow the correct work sequence on-site and inspect thoroughly before making your final payment.
Every stage of this process connects to the next. Skipping one step creates problems in another. A rushed budget leads to a poor contractor choice. A poor contractor choice leads to quality issues. Unresolved quality issues follow you into the home you worked hard to build. Take each stage seriously and the full picture comes together well.
At Singapore Home Renovation Services, we have guided homeowners through this entire process for over a decade. We understand the rules, the work sequence, the common pitfalls, and the decisions that matter most. We work with you from the first budget conversation to the final defect walkthrough so nothing gets missed.
Ready to start your renovation the right way? Reach out to us today and we will walk you through every stage from start to finish.